- Home-
- Blade & Sorcery-
- Mods for Blade & Sorcery-
- Frame free NPCs


Frame free NPCs


About This Mod
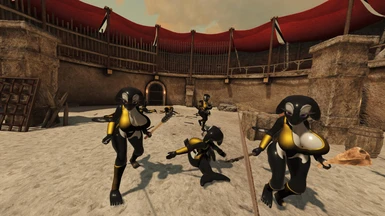
Concept proof mode. All you need is an sdk to create humanoid non-player characters with special collisions.
This regime is proof of concept.
I am now downloading it to save the collected information, which seems to be difficult to access.
I know it hurts.
I wanted to have special enemies who had their own skeletons and colliders. I've had some success. The available warnings are as follows:
Private NPCs do not support mannequins. Sdk does not have any major components.
The further away your skeleton is from the basic human, the more brain work you need to do to make it work. A lot of it doesn't apply to me - if you want to create a dog or a dragon, wait for the Mememan Creature SDK tool.
When the face is animated, the eyebones are attached to the base of the skull. I'm not sure if this is a user error, SDK restriction or error. I am currently awaiting a response from the wf on this matter.
You need to set the pool to 0 in json.Otherwise, if the npc is removed, parts of the chassis will be missing and reappear. Again, we expect a response from Wf on this.
But if you only need a humanoid adversary of a slightly odd AMI shape, we can do it now.
This guide assumes that you already have basic knowledge of Unity and BAS SDK.
Create and export grids:
In sdk, \Assets\SDK\Examples\Characters\Sources contains a network of fbx and mixed-format towers that can be used as a baseline. Unity humanoid gear must be fully stocked, so even if you don't use it, make sure you have all the bones (including optional bones) in your gear. If you don't, you'll get a fatal error when walking on two legs in the game.
Pay close attention to the settings of these axes. If you do not change the default bone axis, they will all be rotated incorrectly and exported, and the grid will look like a stack of spaghetti.
Build in unity
Import the model, turn on read/write and install the rig on the humanoid.
Make the material ThunderRoad / Lit. If you want to display combat damage, turn on "Show Stickers". Create the material to be used for stuffing the ends of severed limbs.
I have TestChar in Assets \SDK \Examples\Characters. Leave TestChar and the character model on stage and unpack it. Inside the TestChar \ Mesh there is a skin net and a drilling rig for non-player characters.
Remove the snap-in using TestChar SMR and leave it in place. Congratulations, you just broke all those teams. Start at the beginning and fix all threaded links.
Direction
Creature ID: give it something unique.
Animator: It must point to a grid object. You may have to fix the broken animator link first.
Jaw: The character's jaw bone.
All eyes: At present it seems that the eyes are broken, so you can throw off these areas. If you want to configure them: copy the CreatureEye component from the test panel's eye (it is on the instrument), set the links to your own installation and leave them in these links.
Knitting
Replace the picture with the imported model.
Add a sample material for each SMR. under the grid group and obviously stick a sticker if you want it to have a damaging effect.
Rag Doll
This is where most of the action takes place. At the root of the rag doll, make sure that the mesh snap and mesh root points to the snap root and lower back.
Then move each piece of rag doll down, making sure that the mesh points are the bones that follow the collider. Now we'll post them later to install only links.
Some parts connect the bones together. You can drag a new copy of testchar onto the stage to see which bones are associated with which colliders for vanilla behavior.
When crushing, lower the already formed filling into the slot for filling the slice.
When you reach your hand, find the two fingers going down, and unroll everything under them. You have to put all the bones of your fingers in the right nest. In fact, it can be automated through scripting.
Once the finger bones are inside, slide them down to the wrist relaxator and release the arm bones. When you set the twisted bone, the rest is automatically filled. If the equipment does not have a twisted forearm bone, you can safely remove this component.
Once all the bones are installed, it's time to install the collider. Above the menu bar is a menu called Animation Hardware, which has the Align Transformation option. Select the Ragdoll object, select the target bone, and perform an alignment transformation to roughly put it in place and fine-tune. Don't use shortcuts or try to scale ragdoll's root objects, otherwise your npc will vibrate to death in the game. Configure the objects below it individually. Add new colliders as needed to fit your specific model. Don't forget to give them physical material.
If you have a brand new piece of rag doll:
Create a new game object below the track.
It aligns the transformation with the main bone.
Add a rigid body component.
Add the rag doll parts component.
Sets the collision handler for input only
He sets the mesh bone of a piece of rag doll on the main bone of the collider.
Adjust the type to match the part you want to add.
Sets the top of the ragdoll to which it is attached.
If you want to cut, select Allow Slicing. Adjust the settings to suit your taste.
Add a character connection. Specifies the bound body to the parent ragdoll object.
Add GameObject to the new section, name it CollisionGroup, and add the Collision Group component to it. Add a collider below it.
If there are overlapping colliders somewhere, put them in the ragdoll skip list.
After all this, make your character addressable and create an entity package.
Ragdoll validation error: Run the Unity project and check the ragdoll group in the hierarchy. The properly configured part is moved into the equipment as a daughter part of the bone. You will most likely receive a missing creature error message from the catalog and no hand positions were found. They're fine, they're not in the game.
JSON
If you have never used the bass setting before, look for Blade&Sorcery\Bladeandsorcery_Data\StreamingAssets\Default\bass.jsondb. This is a .zip file filled in by JSON. Get him out of here.
Copy the default creatures, containers, and brains into the mods folder.
In the creature file, you set the identifier, the finished address, the container, and the brain. Set the combined quantity to 0. There are irrelevant data, such as ethnic groups, which can be turned off if necessary, but it does not seem to hurt to stop smoking.
Configure the hardware in the container. Note that non-player characters created by players cannot be equipped with parts of the mannequin. All you do is give them a weapon.
Test your creatures with the default brain. Depending on how far away you are from the main person, it may or may not work. Perform brain surgery as needed. Adjust the wave as necessary.
Error:
Pressed face: You have verticals on the bones of the eyes and eyelids. Now it seems to be broken. Put it on your face until you fix it.
Bi-legged error on console: Union humanoid was not fully populated.
In the case of Ragdoll Null ref, error setHeight: Ensure that the root Ragdoll has a set of roots and thighs.
Fragmentation does not work: The model is set to read/write enabled.
Similar Mods/Addons

Unbroken Limbs U121.1Mods for Blade & SorceryBlade & Sorcery
For viable limb amputations, if they occur, reattachment of the limb is prevented.Avoid reattaching... 100
100
Kunai Kiriko (U12)1.1Mods for Blade & SorceryBlade & Sorcery
Chirico's secondary weapon in Overwatch 2.100
Lava Dragon Island Old School Map Runescape U1111Mods for Blade & SorceryBlade & Sorcery
Add Lava Dragon Island from Oldschool Runescape to your game.Enjoy!000
Grenade launcher1.0Mods for Blade & SorceryBlade & Sorcery
I'm not sure if I can do that....Grenade launcher. It may or may not blow things up very well (inclu...000
Skyrim Dovahkiin Pack8.3Mods for Blade & SorceryBlade & Sorcery
Sing your enemies like Dovakhkin (with music)This fashion was very fun to create, it consists of 2 t...000
Fire Core (U10)1.31Mods for Blade & SorceryBlade & Sorcery
Main mode to support the modes I made.Note: If Vortex is somehow corrupted, please set it manually,...000
A.M.P (U8.4B6) mod1.3Mods for Blade & SorceryBlade & Sorcery
A.M.P Attach a projectile-throwing device mounted on your left hand.Press the spell wheel to turn it...200
Example skill tree1Mods for Blade & SorceryBlade & Sorcery
Add a new skill tree sample as a template to see how the skill tree is created in a simple and easy-...000
Event Horizon U8.4B81.1Mods for Blade & SorceryBlade & Sorcery
Adds a black hole spell, with all possible merges (base game) and enhanced features.Blackholespell i...000
Endless Duel Waves U91.2Mods for Blade & SorceryBlade & Sorcery
This mod adds endless waves on October 1 to 1, which uses medieval mega-weapons.This mod is no longe...000
Blackbeard's Sword (up to 9.3)1.2Mods for Blade & SorceryBlade & Sorcery
According to legend, this infamous blade was founded in the lost city of Atlantis by the sea god Tri...000
Dragon Ball Z- Turtle House (up to 11 years old)1.4Mods for Blade & SorceryBlade & Sorcery
Turtle HouseIt includes a mirror, a TV, a world map and great music that can be turned off by hittin...000
Todd (U10)1.1.0.0Mods for Blade & SorceryBlade & Sorcery
Todd's a friendly little fox! Jonathan is his mortal enemy, and he appears by the fireplace in your...000
Dumb is a time stop sound repeater11.4Mods for Blade & SorceryBlade & Sorcery
He changes his silly Ahh voice and the sound of Lil Husky stopping time000
Rubber duck1.4Mods for Blade & SorceryBlade & Sorcery
CharlatanThis is a rubber duck. He's squeaking. He swims.Long live His Majesty, Lord of the Ducks Da...000
Elucidator2.5Mods for Blade & SorceryBlade & Sorcery
The sword used by Kirito in the SAO.Elucidator is a thin sword that Cirito used in SAO. Break it and...000
Asta's Demon Sealing Sword1.0Mods for Blade & SorceryBlade & Sorcery
A weapon mod that adds Black Clover's Demon Slayer sword.The 3D model is available here:https://www....100

Power (gravity correction).1.0Mods for Blade & SorceryBlade & Sorcery
Gravitational modification to approximate the Force. More powerful traction. One push pushes the opp...100
Raiden armor from HankY (U12)1.0Mods for Blade & SorceryBlade & Sorcery
This mod adds the following:- 1 set of male armor (4 items)I am truth and light. I will protect the...000